A full library of all the downloads, translations, and guides to help you navigate and enjoy your Tamagotchi M!X
OFFICIAL TAMAGOTCHI M!X GUIDE BOOK - 128 pages of FULL COLOR, with English Translation on some pages.
EZGotchi for M!X by Mr Blinky - EZGotchi is an easy way to earn easy money for your Tamagotchi!
TAMAGOTCHI M!X CHARACTERS & LOCATIONS CHART - This is a comprehensive chart showing the differences between the characters available on each M!X Version, and their respective locations of where to find them.
Built-In Characters Growth Chart
- TAMAGOTCHI M!X MELODY & SPACEY - Credits to Tama-Star_Girl
- TAMAGOTCHI M!X ANNIVERSARY
- TAMAGOTCHI M!X SANRIO - Credits to Neomametchi
Characters' Favourite Item Guide
- TAMAGOTCHI M!X MELODY & SPACEY - Taken from the official Tamagotchi M!X Guide Book
- TAMAGOTCHI M!X ANNIVERSARY - Credits to Samantha Tan (Instagram: @sammytchi_827)
- TAMAGOTCHI M!X SANRIO - Credits to Samantha Tan (Instagram: @sammytchi_827)
- TAMAGOTCHI M!X DREAM - Credits to Chloe Olson
Icon Translation Guide
- TAMAGOTCHI M!X MELODY & SPACEY - Created by Fuzzy N Chic
- TAMAGOTCHI M!X ANNIVERSARY - Created by Fuzzy N Chic
- TAMAGOTCHI M!X SANRIO - Created by Fuzzy N Chic
- TAMAGOTCHI M!X DREAM - Created by Fuzzy N Chic
- TAMAGOTCHI M!X ANNIVERSARY GIFT - Credits to @sammytchi_827
Character Color Change Guide
- TAMAGOTCHI M!X MELODY & SPACEY - Created by Fuzzy N Chic
- TAMAGOTCHI M!X ANNIVERSARY - Created by Fuzzy N Chic
- TAMAGOTCHI M!X SANRIO - Created by Fuzzy N Chic
-
TAMAGOTCHI M!X DREAM - Created by Fuzzy N Chic
Location Unlock Guide
- TAMAGOTCHI M!X MELODY & SPACEY - Created by Fuzzy N Chic
- TAMAGOTCHI M!X ANNIVERSARY - Created by Fuzzy N Chic
- TAMAGOTCHI M!X SANRIO - Created by Fuzzy N Chic, credits to Katie Santiago for the tips!
- TAMAGOTCHI M!X DREAM - Created by Fuzzy N Chic
- TAMAGOTCHI M!X ANNIVERSARY GIFT - Created by Fuzzy N Chic
Faceplates
PRINTABLE FACEPLATES FOR TAMAGOTCHI M!X - Created by Fuzzy N Chic
How to print the faceplates in the correct size: Open up Microsoft Word, paste the image of the faceplate into Word Doc, then right click on the photo and resize it to the correct size. Print. Done! =D
How to Remove Faceplate Tutorial
I am a HUGE FAN of the Tamagotchi M!X but unfortunately, I can't say the same for their faceplate designs. The alternative? Change it!
This tutorial teaches you how to safely and properly remove the faceplate of your Tamagotchi M!X. However, please note that small dents/scratches might occur. I will not be responsible for damage caused to your Tamagotchi M!X.
Also, another important thing to note during this is that there will be a lot of small buttons coming loose and screws that will be left lying around. Remember to put them in a safe place and do not lose any of them.
Step 1
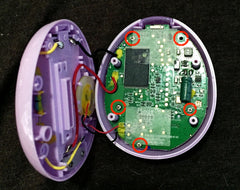
Remove the battery cover, and you will see 4 screws (circled in red). Remove all 4 screws using a screwdriver.

Step 2
After removing the 4 screws in Step 1, you can now open up your Tamagotchi to reveal its guts. On the green circuit board, there are 5 more screws (circled in red); you have to remove all of them. These 5 screws are slightly tinier than the 4 screws in Step 1.
Be careful not to touch any other components of the circuit board and remember to keep your hands clean while working on this.
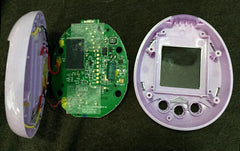
Step 3
After removing the 5 screws in Step 2, you should be able to separate the circuit board from the front casing.
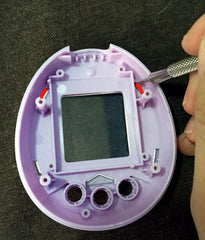
Step 4
Here comes the hard part. If you look at the back of the front casing, you can see tiny grooves on all 4 corners and the bottom, where the plastic transparent faceplate is slotted in. You want to push them out from the back so that the faceplate pops out from the front.
Using a very small and flat screwdriver (I used the kind of screwdriver used for watches), slowly pry against the top left and top right grooves (marked in red).
Pry gently but firmly. Please note that during this step, you may cause some dents to appear on the plstic.
Step 5
Once the top left and top right "wings" of the faceplate comes off from the grooved slots, the faceplate should pop right off quite easily!
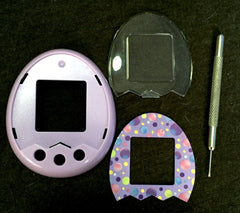
Step 6
Get creative and insert your favorite faceplate design!!
M!X Station
- TAMAGOTCHI M!X STATION ENGLISH TRANSLATION GUIDE - Created by Rachel for Fuzzy N Chic
- TAMAGOTCHI M!X STATION MANUAL - Japanese language manual downloaded directly from the official Tamagotchi website.
- VIDEO GUIDE - This is a video guide that shows you how to use the M!X Station to transfer download content into your Tamagotchi M!X device. Credits to @sammytchi_827